Street Fighter X Tekken: Standard and pre-order gems listed, explained
Dec 14, 2011 // Minish Capcom
Without a doubt, SFxT’s GEM system brings an immense amount of character customization to the Street Fighter universe. Up to this point, however, we’ve only discussed the top-level aspects of this robust system. Today we’re going deeper by providing more details on the gems and their effects, complete with near-final list of every standard and pre-order gem.
-BOOST GEMS-
There are two types of gems – Boost and Assist. Each character has three open slots for gems, and can equip any combination of either type. Boost Gems are the backbone of the game, enabling you to customize a character with all kinds of additional powers and effects in five classes – Attack, Defense, Speed, Vitality and Cross Gauge acquisition. However, Boost Gems must be activated in each round by meeting certain criteria, and said criteria generally increase based upon the power level of the gem. There could also be drawbacks to compensate for the boost. For example:
Immense Power Lvl 1
Effect: +10% damage
Duration: 20 seconds
Activation: Land 5 normal moves
Immense PowerLvl 2
Effect: +20% damage
Duration: 15 seconds
Drawback: -10% speed
Activation: Land 10 normal moves
So, while the Level 2 gem (in this example) offers a bigger power boost, it requires a bit more work to activate, and also slows your character slightly. No gem is intended to be overpowered, and these are balanced through a combination of the benefit, activation condition, time the gem remains active, drawback and how many gem slots are required to equip.
-A level 1 gem generally has a 10% benefit to a stat category
-A level 2 gem generally has a 20% benefit to a stat category
-A level 3 gem generally has a 30 % benefit to a stat category
There are often multiple versions of a given gem, each with slightly different activation and duration properties. The goal is to find a gem with an activation condition that suits your style. If you’re aggressive, an Immense Power gem that’s triggered by landing attacks may be for you. If you’d prefer to get your attack boost another way, say by being hit or landing a launcher attack, there are gem variants for that strategy. Check the list near the bottom of the page for the full details of each.
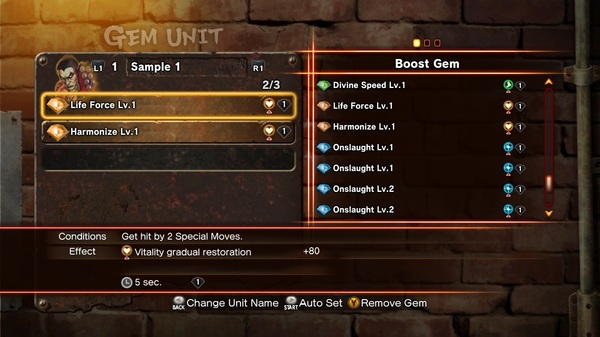
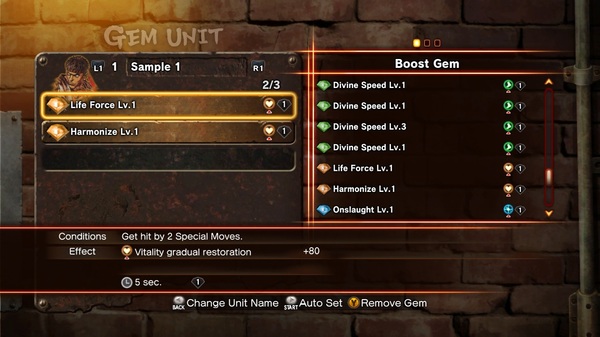
 Above: The GEM equip screen. Notice the list of Immense Power gems – each has slightly different nuances for different types of players
But you shouldn’t just think on a gem by gem basis – consider your whole lineup and how each gem works with each other. Since effects stack, you could go for three similar gems to boost one stat to the max, or make a well-rounded loadout that buffs all areas. Obviously certain pairings work better with certain characters or styles, so that’s yet another angle to approach the GEM system. An example:
Onslaught Lvl. 1
Effect: +10% Cross Gauge acquisition rate
Duration: 20 Seconds
Activation: Land 5 normal moves
Divine Speed Lvl. 1
Effect: +10% Speed increase
Duration: 20 Seconds
Activation: Land 5 normal moves
Immense Power Lvl. 1
Effect: +10% damage increase
Duration: 20 seconds
Activation: Land 3 special moves
In this case, once you land 5 normal moves (which should be prettttty easy) you instantly trigger two gems at once, boosting speed and Cross Gauge generation. While you’re going for that, land 3 special moves and you can add damage to your list of buffs, each lasting for 20 seconds. Time it right and that could be a very beneficial 20 seconds…
 Above: Ryu equipping Life Force and Harmonize, two vitality-minded Boost Gems. Health restores by a set amount rather than a percentage, as is the case with Attack/Defense/Speed boosts
-ASSIST GEMS-
Unlike Boost Gems, Assists are always active and benefit you as a player, not necessarily the characters you choose. They affect the difficulty of your inputs, or enable you to auto block or escape from throws easier. Now, while these sound like game-breaking boons, they actually come with a hefty price, be it a 10% drop in attack power or chunks of the Cross Gauge. Examples:
Easy Input
Effect: Special moves become easier to do
Drawback: Attack decreases 10% in battle
Auto Block
Effect: Block attacks automatically
Drawback: Cross Gauge decreases by 1 block when activated
In short, Auto Block is not a magic win button. Each time you fail to block an attack, you burn off a section of your meter. No meter? No Auto Block. While this could help a new player survive a few clumsy block gaffs, a high-level player may opt to choose a gem that provides a specific boost instead of the meter-leeching Auto Block. As for Easy Input, it’s akin to Simple mode in Marvel vs Capcom 3 – fireballs and other special moves are easier to do, but you sacrifice other areas as a trade.
Now, for the full list of gems standard in Street Fighter X Tekken:
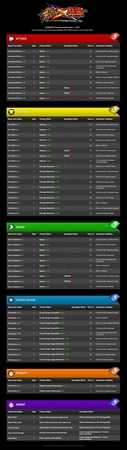 Above: Click for larger, readable version
Quick note about Iron Wall vs Fortitude – the former reduces damage based on a percentage, while the latter is a set value. So, if you take 100 points of damage while an Iron Wall Lvl 1 gem is active with a 10% boost in defense, you’ll take just 90 points; conversely, if you have Fortitude active and eat 100 points of damage, you’ll take zero.
In addition to these gems, there are also various pre-order packs available. These packs include EX Gems, which tend to double up the bonuses but take up two slots in your gem loadout. As with the disc gems, these all vary with different benefit, activation and duration conditions, so some are inherently more valuable to certain players. Check our official site for pre-order details, including the whopping 27 gems you’ll net if you pre-order the Special Edition. (Click each for larger version)
 Above: GameStop offers the World Warrior Pack
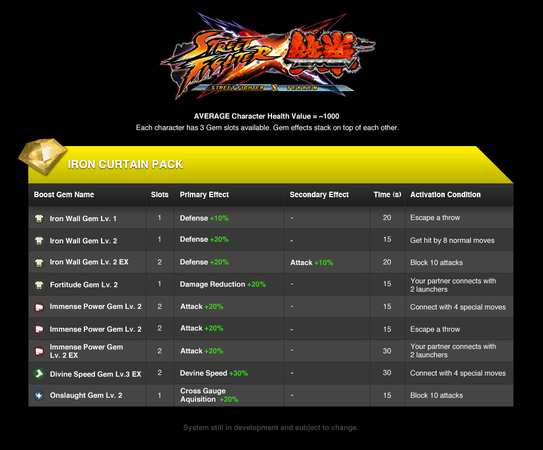 Above: Amazon raises its defenses with the Iron Curtain Pack
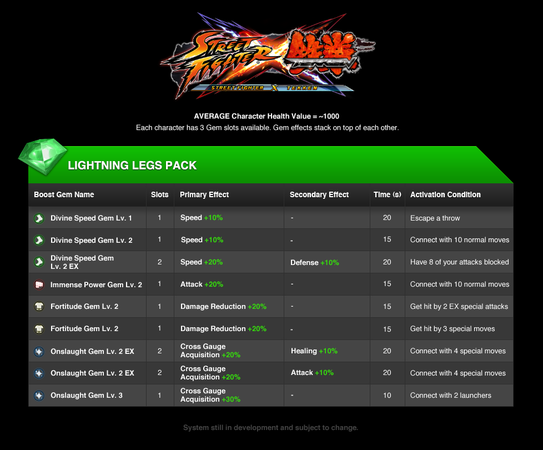 Above: Best Buy joins the fray with the Lightning Legs Pack
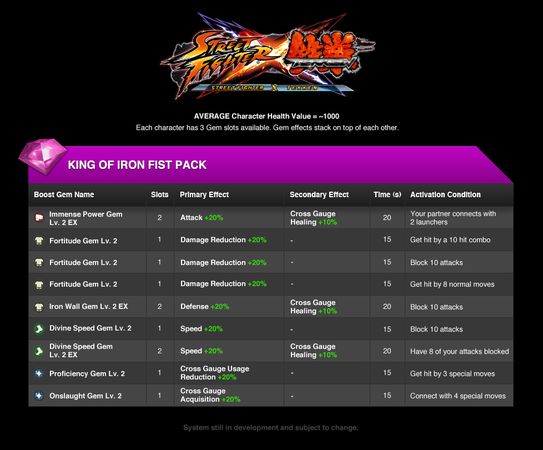 Above: The Special Edition comes with its own bonus pack, King of Iron Fist
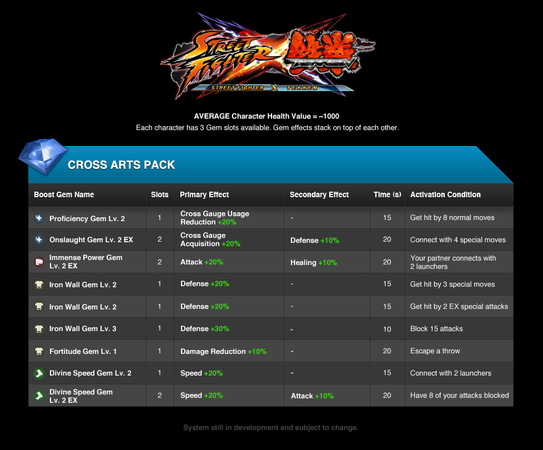 Above: Pre-order the Special Edition to get Iron Fist and Cross Arts – 27 gems total!
I know this is a lot to digest all at once, but once you sit down and start actually playing, the various benefits of the GEM system reveal themselves quite quickly. Think of it like chess – it’s tough to concisely explain with text and images, but sit someone down in front of a board and you can explain the core concepts pretty fast.
For even more on the subject, we have “X The Line: Episode 4” that goes into great detail.
-
Brands:Tags:
-

Loading...
Platforms:
